Showing posts with label hook 1. Show all posts

Four Tips to Find a Great Deal on a Kayak


Labor Day marks the end of summer for most folks. It's back to school time for the kids. Businesses are starting a new fiscal year soon and the holidays are within sight. What Labor Day also marks is the beginning of sale season for kayaks.


Kayaks, both used and new are at the end of their cycle for the year. Dealers are reducing old inventory for the winter months, increasing new year models, doing some trade-ins, selling off the rental fleet and clearancing out. They know the pattern. It's their business. Craigslist will be flooded with people needing to sell a kayak for this or that. There are nomadic, seasonal kayakers who often sell a boat just to make a lease payment for deer season. Then there is dad, who thought he could convince the family to kayak with him, who instead is needing to sell a tandem to get a solo kayak. It takes all kinds. Often it works out for both parties. Everybody gets what they want and the cycle continues into next year.


Commonly thought of as a summer time hobby or sport, kayaking enjoys a bolus of participants between May and September. The crowds on local lakes start to thin more and more as the weather becomes more tolerable. Hunting season has started and for some that means dove hunting and then deer hunting. For me it's always DEAL hunting. 

Over the last several years I have used fall and winter as a time to upgrade. Often, there are folks looking for a boat I have, rigged and ready to fish and are willing to pay a fair amount for it as is. I'd then turn that money into a better deal for me by finding great deals. Here are a few tips to help you find a great deal:

1. Look at Buy/Sell/Trade Sections on Your Local Forums


Chances are you belong to a local forum or six. Kayaks can often show up here for not a lot of money. Make sure you do your research though. A few unrealistic (or opportunistic) folks will try to get you to pay retail prices for a used kayak. Don't want to risk getting swindled? Check out the next tip.

2. Call a Kayak Dealer or Two


Dealers can't advertise their best prices. The kayak market for the most part has fixed pricing. If you can go in store it is even better but sometimes a phone call works if you are far away. This time of year it is very important to move inventory from the previous year. Brand new kayaks needing new homes can be had at better than used pricing very often. Don't believe me? Call HOOK 1 at (866) 486-8412 and ask if they have any deals. Tell them Chris sent you. 

3. Don't Forget Craigslist


Depending on where you live, CL can be filled with kayaks. In Texas, especially Dallas, Austin and San Antonio options abound. Just please, reread #1 and do some homework. Some sellers will try to take advantage or just really have no clue that a kayak depreciates. Take a buddy, meet at a place where you can demo the kayak. Speaking of demos.

4. Demo, Demo, Demo


Don't be a knucklehead like me and buy a kayak you've never paddled. It's exciting and sometimes the deals are great but what if you drop $500 or $1,000 on something that you hate. Good luck reselling for the same price. Demo at least the model if at all possible. It doesn't have to be the exact kayak but at least a very similar one. 

Insider Look at Pro Staff Inquiries


As a pro staff director I field emails, messages and texts all day about people wanting to be on the HOOK 1 Crew or Team. I also get plenty of inquiries about how to get on a pro staff.When considering anyone for a position I do a few things. Hopefully knowing this upfront will help you in your future forays into the pro staff realm.

Gearing Up in Phases


As I talk to folks both new and experienced in the kayak fishing world, gear and rigging bubbles up as a subject constantly. Having been in the kayak for more than 10 years now, I have rigged quite a few boats. I have done the "all in, all at once rigging" and then the "little bit at a time because it's all I can afford" rigging. 
I don't really have a preference. It's more of a money thing. If I have the extra cash, more toys is more fun I guess.

What I wanted to do is give a break down of what, in my opinion, are the three phases of rigging. Not everyone does it this way but time and again, it's what I see and what people share they are doing. You can skip phases, do them all at once, or whatever suits your fancy but if you are looking for a starting point, try Phase I. Progress as you see fit. 

Phase I


Tracks- $10-$50- Some kayaks come with it already, some don't. These are or at least can be the base for all attachments. These also allow you to strip off attachments before transport. I use the YakAttack GT175 heavy duty tracks. Tracks come in all shapes and sizes so finding one that fits your needs is fairly easy. 

Adjustable Rod Holder- $20-$40- Flush mounted, molded in rod holders are great but typically mean you need leashes and there is only one angle to choose from. I just upgraded to the Zooka Tube as it handles multiple reel types and lengths. 

360 Degree Light- $40-$85- A must in many states from dusk until dawn, a 360 light lets other boaters know you are there, makes you legally compliant and gives you some light to see by should you need it. The VisiCarbon Pro is my light. I've had the others and this is far superior in every way if you can spare the coin. 

Net- $8-$125- Net styles vary as much as fishing pole choices now. The cream of the crop nets have yet to win my pocket book. I use my $10 Frabill net from Academy and sometimes regret it. I'm thinking my next purchase may well be a better net. 

Anchor- $0-$60- Depending on where you are going to be fishing, anchors have a variety of styles and weights. This is usually one of the first things people purchase who are going to be fishing in saltwater or big freshwater lakes. Some folks even make their own from an old barbell. Whether you are a bruce claw guy or not, an anchor is a quick way to stay on a spot. 

Hawg Trough- $15-$25- Quickly becoming the go to measuring device for Catch Photograph and Release anglers and tourneys, a Hawg Trough should be up there on your list. Need some pointers on how to get it setup? Go here.


Phase II


12 Volt Battery- $20-$30- Lots of ways to do this one but the easiest and most common is a deer feeder battery. 7.5A and rechargeable. Why do you need this? To power the next thing on the list!

Fish Finder- $60-$1500+- Dozens of options for this one. Get the best you can afford and upgrade as you want/need. I use a Lowrance Mark 5X-DSI. It isn't tip top of the line. It's not even color but I'm color blind anyway so yay for saving a few bucks!

Push Pole/Anchor Stick- $50-$100- These can be different or the same. If you fish frequently in water less than eight feet deep, this is a good way to go. I use the Park-N-Pole. I have the 6ft version and wish I had bought the 8. 

Anchor Trolley- $20-$40- So why is this in Phase II and not with the anchor in Phase I? Lots of people simply clip or tie the anchor wherever they can. Not until later do folks discover the advantages of this device. You don't need one to run an anchor but once you use it you will love it. I have the Hobie anchor trolley but several companies make a good one. With a couple of pulleys and some paracord, crafty folks can make one for a few bucks. 

Transducer Mount- Not everyone can or wants to do a through hull mount.Even fewer have a transducer ready boat. For those who like to hang the 'ducer off the side and remove when off the water, the options are few. I use the Mad Frog Liberator and it works well for my needs. 

Gear Box/Milk Crate- $0-$125- If you like to pack lots of baits, you'll need somewhere to put all of those boxes while still staying organized. For the DIYer, a milk crate is often used. I prefer a more rugged, UV protected, solid state box with a lid and attachable hardware with rod holders. For my money, The Black Pak is one of the best accessories I've ever purchased. Think it's a milk crate? Read more here.


Phase III


GPS- $100-$300- If not included in your fish finder, these devices can be helpful to mark those magic hotspots. If you don't mind using your cell phone, you can download the Navionics app and do this for $15. 

Video Camera- $100-$400- GoPro, Contour, Playsports and more are ready to capture your every single move. With a variety of mounts available the sky is the limit. I use a GoPro Hero2 currently.

Camera Pole- $30-$80- So you got a camera but need a unique way to get those cool angles. I use the PanFish mount from YakAttack and a couple of Dog Bones as well to mix up those shooting angles. 

LED Lights- $30-$250- Whether it's visibility or baitfish attraction, LED lights can be the ticket at night. You'll want to do a little research and comparisons to make sure you get a durable product. Need some help? Check here. I prefer 5050 LEDs from SuperNova lights.

VHF Radio- $65-$300- Depending on your destination, a VHF radio could be on your needs list. If you plan on going beyond the breakers, this should be in Phase I. 

Cooler- $20-$500- Again, this is all about taste. How rugged does your cooler need to be? Do you like the popular brands? Yeti, K2, Polar Bear and others offer a wide variety to choose from. 

EPIRB/GPS Locator- $100-$700- Another BTB Phase I item, this can also be useful to help family know exactly where you are at. 

Upgrades- Do you need a rudder? Want to try out some Turbo Fins? How about a better seat? Usually these are some of the last things added though usually intended to do up front. Are they necessary? No. Do they make life on the water easier? Yes. 


Keep in mind every person will prioritize differently but these would be the starting points I would recommend. Think it over, make a list, check your budget and then get after it! 

As always, if you have any questions or comments, let me know! 


Installation to Application: Templates


________________________________________________________________________

Jesse Reynolds is a good friend and fellow kayak fisherman who has a passion for DIY and teaching others how to do it. He has a new page called "Installation to Application" here at paynespaddlefish.com where he will be able to bring cool rigging ideas and helpful tips to everyone. The tab for Jesse's section is up top and I will also post them as a post on the front page when they come out. Enjoy this first installment of "Installation to Application"

_______________________________________________________________________


Templates 
 by Jesse Reynolds

In this ever growing sport we all love, we’ve seen advances on most if not all aspects of Kayak Angling. One advancement I know many kayakers (myself included) enjoy are the accessories offered for tailoring a kayak to one's own preferences and style of fishing. You can look through any website that offers the vast array of aftermarket parts/accessories and be guaranteed that at some point in the past someone has said to his buddy, “you know what would be awesome? A ___ that does this___.”, or someone has spent hours in their garage bending and drilling materials in to an on the water application that suited their needs. You can also bet that those same people are the ones who made an idea or a prototype in to a reality and thus, have helped the sport grow to all of our benefit.

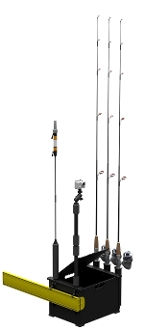
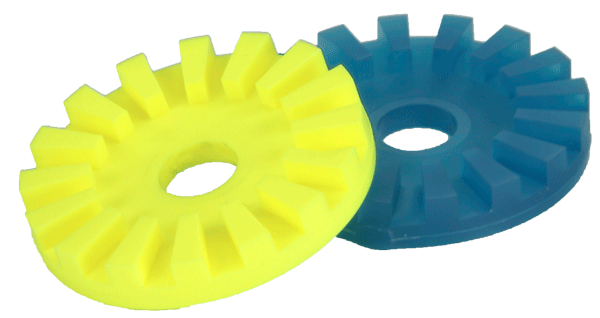
One such product I’d like to talk about is the Silent Traction System (STS) Kits offered at retailers such as Hook1. STS is one of the more basic accessories but none-the-less probably one of the best investments and easiest installations you can do. I mean, why would you glide up to your spot, sneaking beneath the radar only to drop your scissors or bang your rods around while getting situated? Yes STS can increase your odds tremendously but like most things, it’s not indestructible. Your standard kit comes with several precut pieces (circles and rectangles) as well as two larger pieces so you can cut your own shapes to fit your application. In my first two weeks with the STS installed I quickly learned that I was going to need more of the circle pieces that are cut to fit around your scupper holes so I saved the backing from the last pre-cut circle I had and made a template out of some thin card stock. Templates can save you time and a lot of headaches when it comes to making your cuts on STS, so we will show you how to make templates to match the factory circles and rectangles as well as a DIY radius gauge for matching the factory rounded edges on those pre-cut pieces.


Making a Radius Gauge

We will start by making our radius gauge because you will need it to make the circle pieces as well as those rounded corners we spoke about for squares/rectangles.

To make your radius gauge and templates you will need a few items commonly found around the house.

· Ruler - You will need one at least 6 inches long with a good straight edge

· Card Stock - I ripped off the back cover of a note book for this. You will want at least 6 inch lengths

· Pencil

· Small finishing nail

· Hammer

· Razor blade or Razor knife of some sort

· A small piece of fine grit sandpaper


Making the Radius Gauge

1 . Cut a strip of card stock, 1 inch wide X your desired length. 6 – 8 inches will be enough for most applications.

2 . Draw a line the length of the card stock down the middle (1/2in. from the leading edge will get your centerline for a 1in. wide piece of card stock).

3 . Measure up from the bottom edge 1in. and draw a horizontal line across the strip. This will be your pivot point for making your circles or corners.

4 . From that point, measure the distance you want to use as your radius. I suggest making marks at 1/8, 1/4, 3/8, 1/2, 3/4, 1, 1 ½, 2, & 3 inch marks.

5 . Next with your finishing nail and hammer, tap the nail through each of your measured marks on the centerline.

Note: Remember to punch the nail through just enough for a pencil or pen to slip in the hole without excessive play as you will stray off your line if this happens.

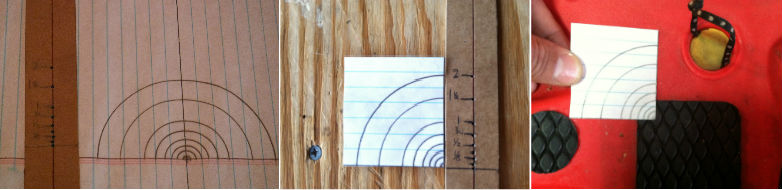
Tip: Once you’ve made your radius gauge, take a piece of notebook paper and make a mass template with all your radius markings to help gauge what the corner radius is on a precut piece of STS. Then cut it in half and you can lay that on any piece of STS to find your radius.


Making Templates

Using the Radius Gauge to make a Circle Template

To make a Circle you must divide the diameter of the circle needed by half and that is the radius you will need to use. Example: If you are making a 4 in. circle use the 2 in. mark on your gauge.

1 . Grab a piece of card stock big enough for the circle you will be making.

2 . Place your gauge on the card stock making sure that you have enough room between the edges of the material and the spacing you will need for the size circle you will be making.

3 . Insert your finishing nail in the pivot line’s hole and place it on the cardstock.

4 . Hold the nail down firmly and insert your pencil in the appropriate length hole.

5 . Simply rotate the pencil and gauge around until you complete your circle.


To make a circle to fit around a scupper hole like the stock STS kit comes with you will need to take a few extra steps.

1 . Measure the scupper hole as a starting point. As an example we will use a 4 in. circle with a hole for a 1½ in. scupper.

2 . Use the Radius Gauge and the ¾ in. marked hole to create a 1½ in. circle but do not pick up the gauge from the card stock.

3 . Knowing that we want our circle to be a 4in. diameter, use the 2in. marked hole on the radius gauge and draw your second circle.

4 . Using the 4in., outside circle, cut out your template from the cardstock.

5 . Lastly, cut out the inside scupper hole circle using a razor blade. Tip: It is easier to cut out this piece by placing the razor on the line and turning the template instead of trying to make your cut by moving your hand. By doing this you will get a nice rounded circle and a factory finished look.

6 . Take your sandpaper and lightly sand the edges clean of any burs debris.

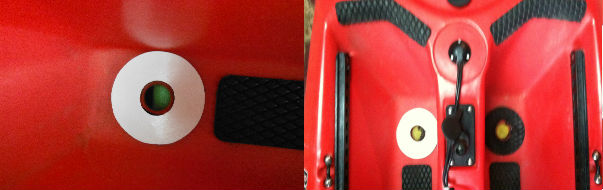
Your finished product should look like this and should match the factory piece.


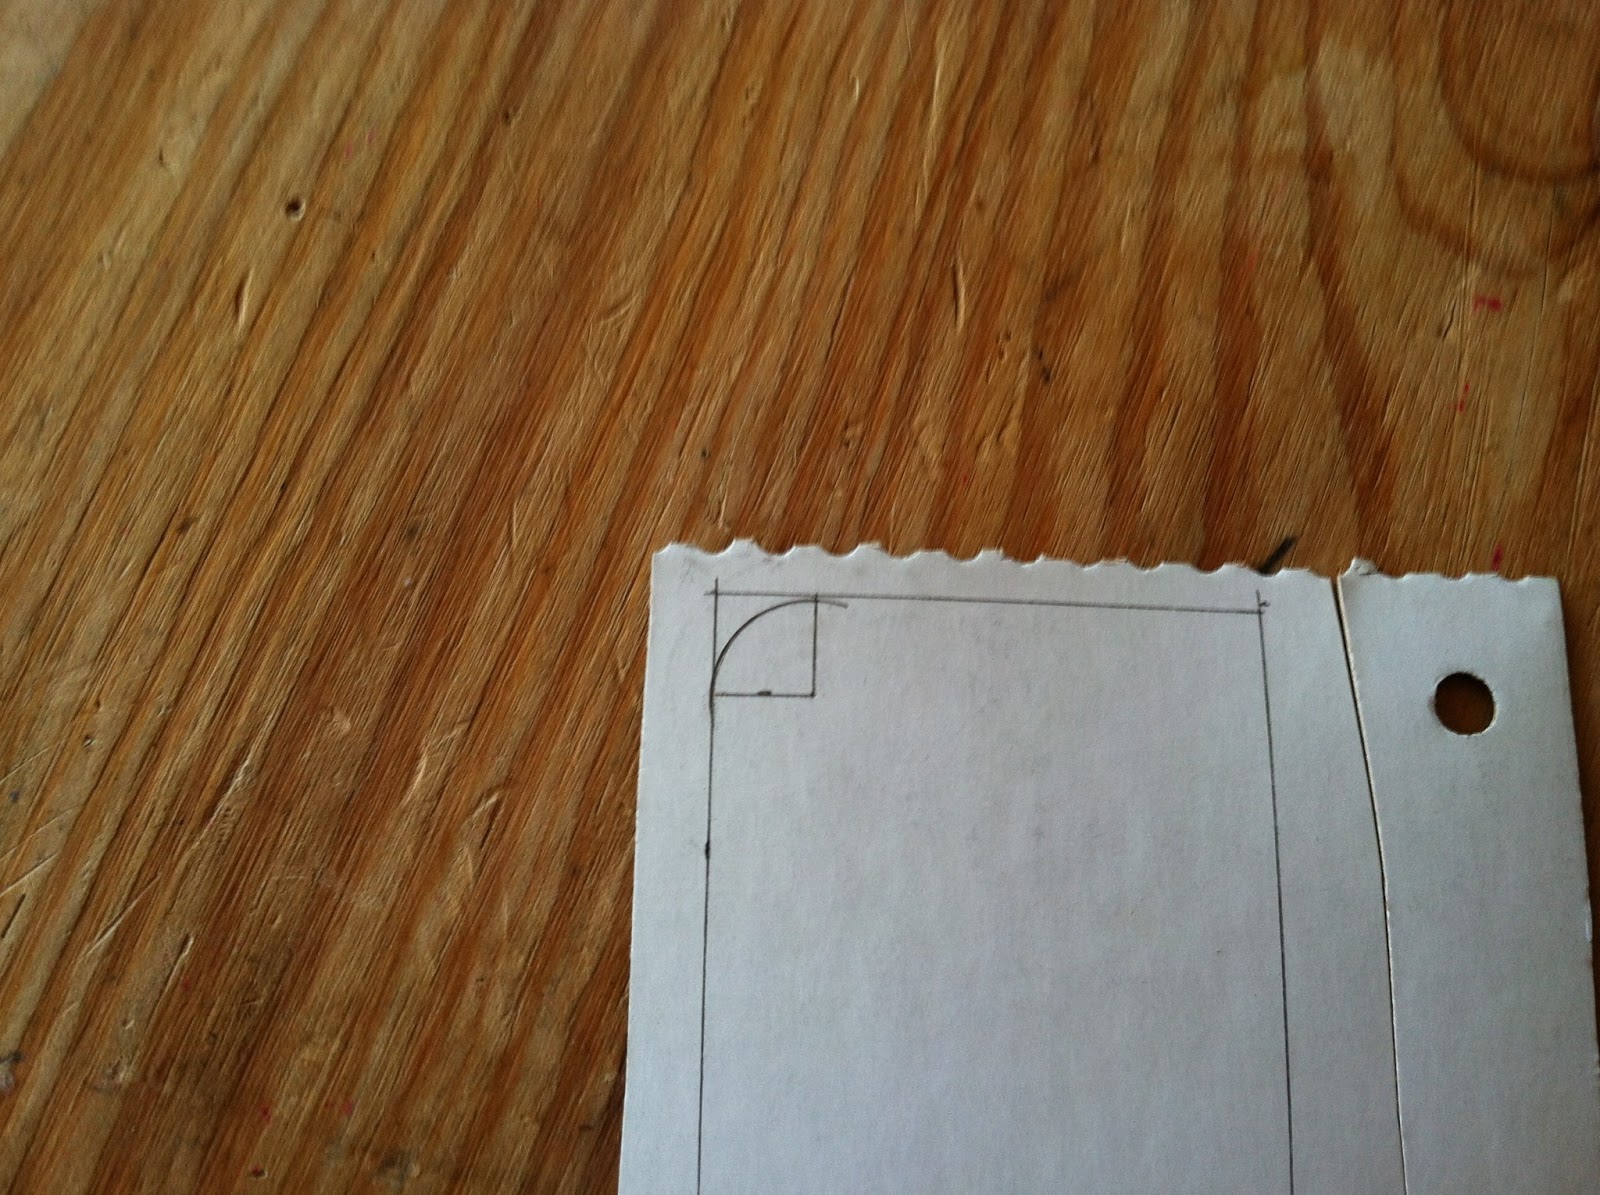
Making a Rectangle Template with Rounded Corners

Making a rectangle is simple enough but we will show you how to make the rounded corners and match the factory STS piece. The factory cut Rectangular pieces are 4 15/16 in. long X 2¾ in. wide with a ½ in. radius for the corners.

1 . Start by measuring out your rectangle to the above measurements.


2 . At each corner measure the distance of your desired radius to make a box in each corner. Remember we are using the ½ in. radius

3 . Once you’ve drawn your boxes in the corners, take the radius gauge and place the axis point on the inside corner of the box.

4 . Now draw your rounded corners with your radius gauge using the ½ in. marked hole.


5 . Now cut out your template with your scissors.

Your finished template should look like this and will match the factory pre-cut piece perfectly.


Now next time you dig your foot in as you’re setting the hook and rip through your STS in the process, you don’t have to be worried about replacing the piece because you now have a template to re-create as many as you want. I hope this has helped some of you and maybe you feel a little more empowered to start coming up with your own designs but remember… make a template first.


The Split Shot Rig


Lots of people have been asking me this morning, "What is a Split Shot Rig?"

It’s not a new thing but, it’s my thing. 

Hag's Tornado F4 in Real Shad
I have used this little setup to put a lot of fish in the boat in some of the toughest conditions. Lots of people look at me like I am crazy but it is versatile and it works year round. I’ve been using a setup similar to the one I describe below for 25 years. I came across it one afternoon while fishing with minnows. I ran out of bait and put a 4” Ringworm on my hook. It started catching fish and I’ve been using it since. I feel I have it to near perfection with more purpose and a better worm.


So, what is it? Simply put, I tie a 1/0 Gamakatsu hook on 6-8lb copolymer or mono line. Then I look at my depth finder. If I am fishing a rock, mud or sand bottom that is clean, I’ll pinch a 1/16th oz split shot 18 inches above the hook. If I am fishing in submerged weeds I try to put the split shot at the height of the weeds. When it’s windy (above 15 mph), I’ll bump up the weight to an 1/8th oz.

That seems pretty simple but that’s not all. Now you need a worm to put on that hook. Most soft plastics sink when on a hook. There are a few that are buoyant but most of those are very plain. I don’t use those. I need maximum fish attracting movement in my bait. That’s why I use the Hag’s Tornado F4. It’s a 4 inch ribbed worm with a hollow rattle chamber. It floats but also sends vibrations through the water when it moves. It’s the best finesse worm on the market for what I am looking to do.
Some of you may be wondering why I change the position of the split shot when fishing submerged weeds. If you have a reasonable growth off the bottom (less than 5ft), you set your weight at that same depth. Then, when the weight falls, it will be on the bottom and the worm will be floating right at the top of the weeds just like the natural baitfish in the habitat. It’s been working for years for me and those I have shared this technique with.

All in all, I suppose you could call it a finesse Carolina rig or reverse drop shot or others. But, when you need to catch fish and your confidence is wearing thin, try a Split Shot Rig. You might be surprised!

For further proof, check out the new video “Split Shot Rigging…” on the Videos page or on this page. I had to try six different colors before I found something they would eat but once I tied on the F4 Real Shad, the bite was on. The last time out on the same lake it was a completely different color they wanted so make sure if you are going to buy some Hag’s Tornados, you get multiple colors. I get most of mine from Tackle Warehouse


I Want A Kayak! But Which One?


It's that time of year. It's cold outside and people have a chance to sit inside and dream of the spring. This is also the season when people start thinking of boats and kayaks. Every winter the kayak fishing forums light up with requests about which boats to look at, which one is for me and myriad other questions.

So which boat should you get? It's not that simple.

You may as well ask which one main dish your town would like to eat every day for the next year. It just isn't that simple.

People have different expectations for everything. We are all unique individuals with very specific things we are looking for. Kayak fishing is no different.

So what do you do? No one will give you the answer. So what now?

Here are a few steps to help make the right-for-you decision.

#1 Make a List

You need to make a list of all the things you are going to do in the kayak and how it will be used.
Are you fishing in big lakes, the ocean, rivers, bays or all of the above?
Are you wanting to troll, drift, sit, stand, paddle, pedal or use an electric motor of some sort?
Are you fishing for bass, crappie, cats, specks, reds, flounder, anything you can catch or all of the above?
Who will be using the kayak? Will it be just you or will others be sharing it?
How will you transport it? Do you have a truck, trailer, car, van? Do you have a roof rack? Do you have cross bars on the roof rack?
How much storage do you want the kayak to have?
Do you fish in the cold much?
Do you fish in the wind much?
Where will this kayak be stored? How much room is in that place (size limits)?
Do you have any health issues that will play into your decision (bad back, bad heart, arthritis, etc)?
How much weight can you lift above your head? How much weight can you raise to your waist?
How much does the heaviest person weigh that will be using the kayak?
How tall is the tallest person that will use the kayak?
What weight capacity, gear and people, will the kayak need to have?

This is by no means the full exhaustive list but it will get you in the right frame of mind to discover what you need.

#2 Budget

This one is tough. Most people decide they want to get into kayak fishing with a max cap of $500. Some have a smaller budget than that. The problem with that number is that will usually only get you a kayak. Let's say you go to Academy and by the Perception Sport Pescador 12 ft kayak (the old Tarpon 120 body). It'll cost you $500. After tax you are already over budget. Now you need a paddle, lifejacket (PFD), and whistle just to be legal and able to go to the lake. This adds another $60 if you get the absolute cheapest stuff that's made. Throw in tax and your $500 budget is now at $670. This is when most people start to look at used boats and settle on a boat in their price range. Usually the kayak doesn't fit that list of things you wanted and more often than not, your $450 you spent on a used kayak turns into a loss because now you are selling the used kayak and stuff for $350 on Craigslist because kayak fishing just isn't for you.

Don't blame the kayak. If you take a date out to McDonald's and tell her to order off of the Dollar Menu only do you think you'll get a second date? Rarely. When you buy a used boat on the cheap that you've done little research on and doesn't meet your needs, your time in kayak fishing is usually, not always, but usually short lived.

Make a realistic budget for what you can do and stick to that but make sure it meets your list. If it doesn't meet your list, save up more money to expand your budget or keep waiting. Trust me here. A boat that meets all of your needs rather than just the desire to get on the water will make you much happier in the long run.

#3 Demo, Demo, Demo

Before you make a purchase, demo lots of kayaks. Technically speaking, there are demo days almost every day of the year. Lots of dealers will meet you at the lake with a few boats you want to try. Meet up with folks who have the kayak already and give it a try. Please don't buy a boat without trying it first. It usually ends in heartbreak. Take your list and check off how many of your desires each boat has. If it is out of your budget, look for a used one or save some more money and get the one you really want.


#4 Research

Talk to people who have the kayak you have narrowed it down to. Do some web research. Look at the manufacturers website. What would they change? How did they rig their kayak for fishing? Would they buy that kayak again? Make an informed decision.


Even if you follow all of these steps, it doesn't guarantee a perfect kayak for you. Chances are, you'll change boats a few times in your life and that is good too. As your preferences change, possible so will the type of kayak you need. But, the chances of you buying the right kayak the first time without any of the above steps is not a very likely scenario. To try to make it easier, I have made a sheet for you to take to the stores, dealers, boat shows, etc. Try it out and see how you like it! If you hand this to the knowledgeable folks at a kayak dealer in Texas like Mariner Sails, APT, Mountain Sports or others, they'll be able to help you find that kayak that is the right fit for you. If you are a little further east than Texas, HOOK1 in Hendersonville, TN or YakCity in Lake Wylie, SC are the best of the best and will have you paddling the right boat in no time at all.

Click to increase size and then right click to save or print


Kayak Bass Fishing Open Looks to be Largest Ever


Always looking to push the limits, Chad Hoover of HOOK1 and Kayak Bass Fishing may have out done himself already in 2013.

Set to start on March 14, 2013, the Kayak Bass Fishing Open and the Kayak Bass Fishing Invitational following is assumed to be the largest freshwater kayak fishing tournament(s) ever held and before it’s all said and done, will be possibly the largest kayak fishing tournament regardless of water type. The venue is a 100 mile area of the Santee Cooper chain of lakes and is centered in Cross, South Carolina. Black’s Fish Camp will be the host site (1370 Black’s Camp Rd. Cross, SC, 29436) and cater to up to 300 anglers. Not all entrants will stay at Black’s though many of the festivities will be centered there.

The KBF Open is the last qualifier for the KBF Invitational which starts on March 16th at a different, private water venue nearby. Both the Open and the Invitational have $100 entry fees with approximately 80% of that paying top finishers. The remaining 20% will go to fund future events and charitable contributions to groups like Heroes on the Water, a group that works with disabled service men and women through kayak fishing across the country.

The Open will be a two day event. Day 1 starts at 30 minutes before sunrise and ends at 4:30PM. Standings after Day 1 will be determined by a Catch-Photograph-Release (CPR) format of each angler’s best two fish. The Day 1 leader will get an automatic bid into the KBF Invitational and continue on to fish Day 2 where they will be joined by the other 100 top finishers (depending on ties) for that day. At the start of Day 2, all previous catches are erased and all anglers start at zero. Starting again at 30 minutes before sunrise, Day 2 goes until 5:30PM. The winner of Day 2 (also a CPR format) will win the Open and proceed with the top 10-15 anglers to the Invitational the next day. It is estimated that the top 20 anglers of Day 2 will receive a check though payout is based on percentages and number of entries. For all the official rules of both the Open and Invitational please visit www.kayakbassfishing.com or find Kayak Bass Fishing Open or Kayak Bass Fishing Invitational on Facebook.

The KBF Invitational will also be a two day event but will be held in Summerville, South Carolina at the private waters of VIP Adventures. These waters hold trophy bass and will up the stakes for the grand prize. The champion after two days will receive an estimated $8,000 in prize money, a new Wilderness Systems kayak, a new Bending Branches paddle, a $250 gift certificate to HOOK1 and many other prizes.
Being known as the Grand Champion of the Kayak Bass Fishing Invitational is in the hopes and dreams of many as anglers from Texas, New Jersey and other far away locales are planning caravans and overnight trips to make sure they have a chance to be crowned champion. With one of the most illustrious payouts ever in freshwater kayaking, it’s no wonder so many are cashing in a week of vacation and a year’s worth of kitchen passes to make the journey. It will be a memory none will soon forget.

_________________________________________________________________________________

If you have further questions please connect with Chad Hoover on Facebook, on Twitter @knotright, on Ustream : KayakFishingGearTV or on kayakbassfishing.com. 

My Goals for 2013. What are Yours?

Welcome to 2013! The Mayans were wrong. We're all still here and we need to keep moving forward. The last four months of Payne's Paddle Fish has been a great one and I sincerely thank those who have visited and keep visiting the site. I couldn't have predicted what has become this truly great experience. I have met so many bloggers, fishermen, kayakers, interested onlookers and outdoors types since August and look forward to meeting, fishing and paddling with many more of you in 2013.

I have, for as long as I can remember, been against making a resolution on New Years. When I think about what I would resolve to do, it's often things I don't want to do in the first place and it becomes counter productive. They are great for most people, just not me.

Instead of resolutions, I like to set goals. I try not to make them too lofty but also not too easy. For 2013 I have several. A list of goals helps me forecast the year, see progress when it is made and refocus energies when necessary. If you don't yet do this, I encourage you to pick one or two things you really want to work on this next year and write them down. Even better yet, make them public. When others know what you are working on, they will often provide encouragement, ask about progress and keep that fire stoked to push through the slow times.

Without further ado, my goals for 2013.

1. Sponsored Fishing Partnerships-

As of today, I don't really have any fishing sponsors. I work with a couple of really great vendors and do some gear reviews etc but the long and short is, I pay for almost all of my stuff. Reels, rods, boats, paddles, pfd, fishfinders and other gear comes out of my pocket. I feel I have a lot to offer as an ambassador to the sport of kayak fishing. I have a platform that is both informative and has a worldwide reach to those into kayak fishing and just curious onlookers with many questions. I would love to be able to travel to trade shows and talk to more people about kayaks, rigging, finding the right kayak for each individual person, fishing in both fresh and saltwater, gear, gadgets and more. I'd like to be able to pair with a company that feels the same way I do about the sport, wants to grow the sport as much as I do and in the end, I can refer people to this company and know they will be taken care of individually and not just put in a boat. Ideally the company would be able to furnish a kayak or two for me to demo with people and then refer them for purchases. I know these opportunities are few and far between but you dream big to achieve big.

2. 300% Growth in Monthly Visits-

The site is still in a growth pattern but has averaged a few thousand visits per month. I'd like to grow that number to 100,000 visits for 2013. It's an aggressive number but I think that as our sport grows more and more people are searching for content, instruction, humor, recommendations and answers. I hope that I can be one of those places that are sought out. I also hope that visitors will visit the sites that I read. Alan, Pat, Bert and others do a great job of providing fresh new content. You can see their newest posts linked on the right column of any page.

3. Participate at Three Trade/Boat/Tackle Shows-

Helping others understand the intricacies of kayak fishing is important. Finding the right boat fit, rigging and gearing up are all important aspects of kayak fishing that are done too hastily and too cheaply at times. Being a 10 year alum of the School of Hard Knocks with a major in Kayak Fishing has taught me many things (and cost me lots of money). If I can save just one person the headaches and money pit that I endured, it would be worth the trip. This is a venue (or 3) that would allow the largest reach for a live audience.

4. Instructional Videos-

I will produce 12 instructional videos over the 2013 calendar year on different kayak fishing topics. Some people just don't like to read column after column on X or Y. They want a 5 minute video showing them what they need to know so they can go on about their business. I want to reach that market in 2013 and give those folks what they are looking for.

5. My First E-Book-

I have been working on and plan to release a kayak fishing book in the late spring. It will be an E-book so I can offer it for free. It will have some stories, some instruction, some insight and really highlight the fun and adventure kayak fishing can bring to anyone's life. It's not so much about a budget as it will give options regardless of available cash flow. I hope everyone enjoys this book and it becomes a resource for teaching others why we love this sport so much.

6. Tournament Fishing-

I plan to fish 8 tournaments this year. I won't be able to start fishing them until March so it will mean some cross trail fishing but that's okay. In fact, it will allow me to meet more people who share the passion. This year won't be about placing as much as fishing and networking. I look to fish in the NTKBF, NTKT, PKAA, KATS and KBF events this year. The NTKT will be a primary focus for me.


Maybe these goals seem out there to some or too easy to others, but the important thing is, they are out there now. If we cross paths on the water or at a trade show, ask me about them. I hope to meet even more of you on the water this next year. If you would like to partner with me on any of these goals please send me an email : [email protected].  Have a great 2013!!!

I Got A Kayak For Christmas. Now What?


Every year it happens. For the last decade that I have been around kayak fishing, Christmas brings a great new flood of people to the sport I love. Thousands of new anglers, looking for a way to get on the water or maybe a different way to get on the water, ask for and receive a kayak for Christmas.

Often times these gifted kayaks are not the $2,000 super decked out angler editions. They are sit-in or sit-on kayaks purchased at major chain stores. You know what? And hear me say this: THAT IS JUST FINE!

You don't need to have a BMW 7 Series car to drive on the highway and you don't need the Hobie Pro Angler 14 to get on the water. Would it be nice? Dang skippy. Is it necessary? Not even close.

I fished my first six, almost seven years out of a $200 sit in kayak from Academy Sports and Outdoors. And it was great. I fished differently then than I do now but every kayak owner fishes a little differently and some of that comes from the type of kayak they fish from. The important things to remember are safety, time on the water and customization to fit your needs.

These throngs of people often find their way to kayak forums and ask the same questions. That is when they get a good taste of what our sport is about. Sharing. More specifically, sharing information.

The questions typically revolve around accessories, where to try, and what is all this I hear about tipping over?

Today, I want to give you some of what I have learned both from the school of hard knocks and by others in the sport who have mentored me.

So I got a new kayak:

What accessories do I need? 
MTI Dio F-Spec


PFD (Life Jacket)- Most people go straight for the paddle. The only reason I recommend a PFD first is safety. If you blow all of your money on a fancy paddle and end up paddling in an $8 PFD that fits like an albatross, you won't be paddling for long. Choose a good PFD and always wear it. Check out the NRS, MTI and Stohlquist PFDs. I also recommend a knife and a whistle to attach to the PFD so you can call for help or cut your way out of a tangle or hung anchor. If you are going to paddle at night, get a 360 degree light. The YakAttack Visicarbon Pro with Flag is a popular choice amongst kayakers everywhere.The PFD and whistle are legal requirements in Texas. The light is also if you are out at night.

Paddle- This is your motor. Use this paddle guide and find the right one for you. If you only have two upgrade things you can buy, they need to be a good PFD  and a paddle. That seems like a no-brainer but lots of people skimp on the first and sell their kayak shortly after from non-use.

Park-N-Pole in a Trolley
Anchor Trolley- It seems strange to buy this before an anchor but believe me when I say you will be much happier if you do. An anchor trolley allows you to use a drift sock, stake out stick and anchor while positioning yourself to take advantage of the wind, not be a victim of it. This also will allow for a quick release if you get into trouble. This is the one I use. Inexpensive and easy to install.

Anchor- This is the most widely underpurchased item under $50. Anchors exist in all shapes and sizes. The most popular one is the collapsible anchor. If you are going to be in water eight feet deep or less, I suggest a YakAttack Park-N_Pole. It can double as a push pole, GoPro camera pole and many other things. Very versatile and it floats. It comes in three different lengths to fit exactly what your needs are.

Anchor Rope (and accessories)- Most anchors don't come with rope. If you are going to be fishing in any current or wind at all most people will recommend 2X the length of rope for the depth you are fishing. So if your fish are in 20 feet of water, you need at least 40 feet of rope. If you are fishing on the coast it is recommended 3X the depth. I like 3/16" rope but choose what you like. Just don't buy 1/16" rope and expect to raise a big anchor easily. While you are there in the rope section, pick up a carabiner and rope float to attach to these as well.

Rod Holders- These come in different varieties. You can get flush mount, rocket launchers, trolling rod holders for baitcasters and spinning, rail mount, and the list goes on and on. Look at some rigging pictures, sit in your boat, see where you can reach and then go buy one.

YakAttack BlackPak
Milk Crate- You can buy one or ask a retail grocer for one. Either way, you can strap this down to the back of most kayaks and hold tons of tackle and gear. You can also add some PVC to be additional rod holders. Cheapest investment you'll love forever. Eventually you may want to upgrade to a YakAttack BlackPak. This is the king of all packs to haul gear and hold rods.

Everything Else-These things will get you going pretty well. After you have the above mentioned items, you should look at, in no particular order: a fish finder, stabilizers (depending on the kayak), drift sock, stake out stick, VHF handheld radio, scupper plugs (for sit on tops), waders, paddle gloves, really the list goes on and on.


Your fishing adventure is just that. Add things as you can and see what others are doing. Go to get togethers. Visit kayak shops like HOOK1 if you are in Tennessee or Mariner-Sails if you are in Texas. Talk to guys who have years or even decades on the water. Talk to the new guys. See what's new, what's a need, what's a want and go for it. And if you buy something that doesn't work out, there is always the buy-sell-trade forums. Most of all, have fun and catch some fish!


A Lesson Learned: Long Walks with a Kayak

In 2003, my new Pelican Endeavor (sit in kayak) in tow, I took my first long hike with my kayak in search of the elusive honey hole. I was very new to the sport and didn't want to spend the money on a kayak cart so I  rigged up a golf club caddy and took off down a long dirt road, a road that hadn't seen a car in twenty years. I was smart enough to bring a buddy with me and he had a very similar setup.
Not a kayak cart

The road was old, sometimes rocky, sometimes sandy and had ruts running on both sides that had been there for who knows how long. Going around turns in the road was an adventure as you usually spooked a wild hog or deer or had to work around a rattlesnake. It was as close to an American safari as I've ever come. The landscape snarled with yucca, prickly pear, mesquites and cedars. It taunted us to make a wrong move. The hike, all gear and kayaks in tow was just over a mile. Because our "carts" weren't made for this terrain, it took several adjustments and close to 45 minutes to get to the water we were so desperately seeking. We saw it up ahead. A sharp rise of about 20 feet. A berm that stretched a few hundred yards was actually the dam on this honey hole and we knew it. With renewed spirits we made the climb and saw what we had come for: the honey hole.

I had bank fished this little spot in northwest Texas once before and had decent success but this time I was prepared with my new boat and a conquering attitude. We unstrapped our kayaks and quickly were on the water. Paddling toward a tree line that looked promising we were greeted by a pair of water snakes who seemed very curious about our kayaks, possibly the first ever on this lake. Two casts into the day we both hooked up and that pattern would continue for most of the day.

Time melted away and what had started at sun up quickly blended into late afternoon. We needed to get back. We hadn't prepared to be out after dark and had no lights to navigate back so the pace was brisk. The walk to the honey hole had been apparently been downhill because walking back to the car was agonizing. Shoulders worn from paddling and fishing all day made the kayak and gear feel like it was an elephant being pulled along on a tricycle. The boat kept sliding off and we kept getting stuck and we were only 100 yards from where we started. As I tried to pull the caddy out from another rut the scariest thing I hadn't known could happen, happened. The bearings and axle on the golf club caddy cart gave way. Broke in two. Now what!?!

After an attempted repair job and failure, I relegated myself to dragging it back. I didn't know what kind of damage it would do but I wasn't going to leave it and there was way too much gear to pack it out. Carrying it was out of the question. I had a 50 foot long anchor rope which I fastened into a harness and started pulling. It was hard work. I felt sorry for every plow horse and mule I had ever seen. My friend, being the good sport he always is, rotated shifts with me dragging this albatross back up the winding, rutted, mine field of rocks and cactus.

Nearly two hours later we reached our destination, completely exhausted and sun baked. I immediately started downing any available fluids I had. Though it had only been about 80 degrees I am sure my core temperature reached liquid steel a couple of times. We sat until dark, recovering and learning rapidly from our mistakes.

I learned so much about having the right tool for the job, preparation for the worst case scenario,  and how to plan for a trip just from that one outing. A steep learning curve leaves scars sometimes.

I haven't been back to that spot since. I have bought better equipment though. I have also been game planning with every possible scenario. Knowing what you are up against is a good battle but the unknown is the one that will ruin a day.

Plan well and invest in a good cart.

_______________________________________________________________________


Looking for a good cart?

Here is a good option from HOOK1: (Click here to purchase)


Gear Review: Scotty Gear Head Track Adapter

Today we look at the Scotty Gear Head Track Adapter (No. 438). I'll go ahead and show my cards early. This product may have been the one thing that kept me from removing all of my Scotty gear from my kayak. Those are strong words but let me explain.

Since 2003 I have used Scotty bases for everything from rod holders to depth finders. For kayak fishing you had either an above deck mount which had a tall footprint or the flush mount which meant you had to use a hole saw on your boat. I'm not opposed to drilling holes but a hole saw?
Scotty Gear Head Track Adapter No. 438

This year I was waffling back and forth between converting completely over to Ram Mounts. I had a couple of things I really liked from them but didn't want to throw down the cash to rebuy everything. That tall mount in the back kept taunting me. It stuck up above everything else and made loading upside or stacking anything back there difficult. And then I found the Scotty Gear Head Trac Adapter. This product allows me a removable and mobile solution to using Scotty products when coupled with the YakAttack Gear Trac or the Mighty Mount.

At first I wasn't sure how much weight I could put on that t-bolt in the bottom of the adapter. So why not test it out? I mounted two 4" x 2" heavy duty Gear Trac plates (GT175-04) where I had previously had a big Scotty mount on the back. I put the Scotty Adapter on one of them. Then I attached a Scotty Gear Head Extender (no. 429) to get the connection point out to the side of the kayak. I then attached a tall PanFish (PFS) camera mount and then topped it with my GoPro. The result? It was rock solid. There is a little bit of sway which anything this large attached by a single point on an axis of 90 degrees would do. But it is just a touch.

I then utilized another 438 to get my 360 light up and off the deck. It worked exactly as would be expected.

The t-bolt in the bottom can be a little snug when you first get it out of the package but a little bit of torque will loosen it right up.

YakAttack GT175-04
The Track Adapter has a twist locking mechanism to hold your accessories securely in place and then with a twist release them to be stowed. I felt this was a vast improvement over previous methods. Having to find just the right lift to be able to rotate and twist out was aggravating. Scotty has done away with it. I can now have a rod holder or light or camera mounted almost anywhere on my kayak when I use a Gear Trac. If I need a mount in a very slim area, I can use a GT-90 from YakAttack and get after it.

For about $17, Scotty has saved me a ton of money in repurchases, made my fishing easier and more mobile and kept me as a customer. That's pretty good in my book.

Check out the "All Rigged Up" video in the videos section at the top of the page to see the mounts from Scotty and YakAttack in action.

Click on the links below at HOOK1 to see more specs and order some of the products talked about here.

Scotty Gear Head Track Adapter (No. 438) 

Scotty Gear Head Extender (No. 429)

PANFISH Camera Pole from YakAttack (Scotty Mount)

Gear Trac 175 from YakAttack

Gear Trac 90 from YakAttack


Scotty Offset Gears and Slip Discs Review

If you could buy two items that could make your fishing simpler, more dialed in and easier would you? What if I told you that together both items would cost less than $10? It sounds too good to be true but it's not. I have the magic items and I can tell you, they are worth twice what they are asking if not three times.

Scotty No. 414 Offset Gears

So what are these modern marvels? Let me introduce you to the Scotty No. 414 Offset Gears and the Scotty No. 415 Slip Discs.

The Offset Gear is placed between the two existing gears on a Scotty mount to double the number of adjustments you can make. Finding a better angle but still maintaining that rigid hold is not only possible but extremely inexpensive. I used the Offset Gears in my Scotty Gear Head Mount Extender (No. 429) to get a better angle for my GoPro which is attached to a PanFish Camera Mount from YakAttack. I just couldn't get the angle I wanted with the standard gears. I popped in an Offset Gear and voila!I had what I wanted. I also tried it out in a Scotty rod holder which worked well but I still needed more fine tuning capability. That is where the No. 415 Slip Discs came in.

The Scotty No. 415 Slip Discs will tune as finely as you can dial it in.
Scotty No. 415 Slip Discs
A typical Scotty gear has teeth on both sides. The Slip Discs have teeth only on one side. What this allows you to do is make micrometer like adjustments up and down to find the perfect angle on that rod holder. These can be used with all the other Scotty mounts that have gears in them as well. The only thing you are really giving up is that iron clad security of teeth on both sides. With enough force the Slip Discs will do exactly that, slip. That's what they are made for. With a hand tightened nut on a rod holder or extension, in almost all applications, the 415 will be good to go.

Scotty No. 429 Gear Head Mt Ext.
I started kayak fishing with Scotty rod holders almost a decade ago. I fished them more because of the price point difference than because of functionality. There were other rod holders that had better adjustability but they were twice the cost. I knew the Scotty rod holders and extenders were clunky. The angles never seemed what I really wanted and so I eventually stopped using them. With the release of the Offset Gears and the Slip Discs, Scotty is going to get another shot on my kayak. The price point on Scotty products is already hard to beat and with these newest additions, affordability and functionality are both part of the new equation. If you are looking for a way to fine tune your Scotty products and your fishing, this is it,

If you would like to order some of these products you can go to the links below. These folks at HOOK1 are top notch and have the best prices around.


No. 414 Scotty Offset Gears (Listed at $4.49)

No. 415 Scotty Slip Discs (Listed at $4.49)

Since I mentioned it, if you needed to check out a Gear Head Mount Extender, here is a link as well:

Scotty No. 429 Gear Head Mount Extender (Listed at $24.99)

Thanks for reading. More reviews are on the way this week as we will look at some additional Scotty and YakAttack products.

All Rigged Up

Next week I'll have full details, reviews and ordering information up for most of the things you see here. Thanks for watching!


Ram Mount to Mighty Mount Rigging


Gear Rigging Preview


Black Friday Deals on Kayak Fishing Gear

If you need some new kayak gear, check out Hook 1.You can find them at www.kayakfishinggear.com. Sales are on now. Enter BLACKFRIDAY in the promo code box at checkout and watch the savings pile up!